Dead Bug : .Correct Anterior Pelvic Tilt
Lock your spine in neutral and bulletproof your standing posture.
The Dead Bug teaches your abs to hold your pelvis steady while your limbs move—preventing the "swayback" (anterior pelvic tilt) that steals inches from your height.
How to · How To Do The Dead Bug
The goal is not to move your limbs—the goal is to keep your back flat while you move your limbs.
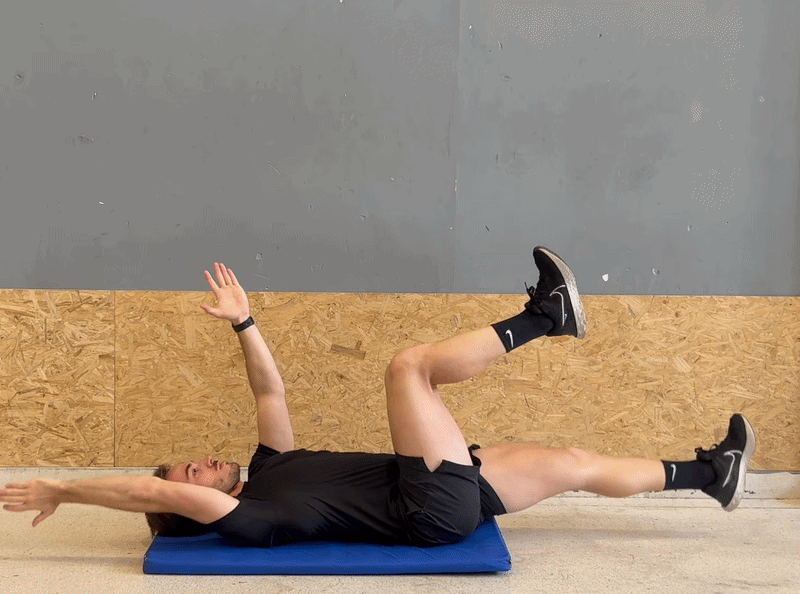
- Supine Setup: Lie on your back with arms reaching straight to the ceiling. Bend your hips and knees to 90 degrees (tabletop position). Gently press your lower back into the mat to engage your deep core.
- Opposite Extension: Slowly lower your right arm behind your head and extend your left leg forward. Go only as low as you can without your lower back peeling off the floor. The other limbs must stay frozen.
- Return & Switch: Exhale to pull the extended arm and leg back to the starting tabletop position. Inhale, reset your core tension, and repeat with the left arm and right leg.
- “Imagine crushing a grape under your lower back—don't let it roll away.”
- “Move slowly: 3 seconds down, 3 seconds up.”
- “Keep your ribs knitted down, don't let them pop up.”


Reps & Sets · Volume & Frequency (Posture-Focused)
We use high-tension, slow reps to build the endurance needed for standing tall all day.
Tip: If you feel your lower back arching, stop the set immediately, reset your core, or switch to an easier variation. Quality over quantity.
Variations · Scale the Difficulty
If your back hurts or arches, regress the movement to maintain the height-boosting benefits.


Height Impact · How Dead Bug Adds Visual Height
- When your deep core (Transverse Abdominis) is weak, your pelvis tilts forward, causing your lower back to curve excessively (hyperlordosis). This curve reduces your vertical height.
- Dead Bug teaches your body to brace the core and neutralize the pelvis while moving your arms and legs—simulating walking and standing.
- By flattening the lumbar curve and stacking the pelvis correctly, you can reclaim 0.5–1.0 cm of lost height and look significantly taller and more confident.

Panel 1 – Neutral Spine (Supine)
The blue glow highlights the deep core muscles locking the pelvis in neutral. This "flat back" position is the blueprint for a taller spine.

Panel 2 – Vertical Translation
That same core control translates to standing. The pelvis is neutral (not tilted forward), reducing the lumbar curve and maximizing vertical height.
Form & Safety · Key Technique Cues & Common Mistakes
- Keep the low back glued to the floor at all times.
- Exhale hard as you return to center to engage abs.
- Keep the neck relaxed on the mat.
- Move only as far as you can control.
- If your lower back hurts, you are likely arching it—reduce the range of motion.
- If your neck hurts, place a small pillow under your head.
- Avoid holding your breath; steady breathing stabilizes the core.
- Rib flare (chest puffing up).
- Arching the lumbar spine (mouse house under back).
- Moving too fast using momentum.
Why it steals height: This reinforces Anterior Pelvic Tilt, exactly the posture we are trying to fix.

Why it steals height: Speed uses momentum instead of muscle. You won't build the deep stabilizers needed for permanent posture change.

Pair With · Best Exercises to Pair With Dead Bug
For the Pelvic Control pillar, Dead Bug works best with:
Combine Dead Bug with Glute Bridges to fix Anterior Pelvic Tilt from both sides: strengthening the abs (front) and glutes (back).
FAQ · Common Questions About Dead Bug
-
Q1 Why does my lower back click/pop? ›This often happens due to tight hip flexors (psoas) snapping over the pelvic bone. Try reducing your range of motion—don't extend the leg fully straight until your hip mobility improves.
-
Q2 Can I do this if I can't keep my back flat? ›Yes, but use the "Heel-Tap" variation. Do not force the full extension if your back arches, as this reinforces the bad posture you're trying to correct.
-
Q3 Do I need weights for this? ›For posture correction, bodyweight is usually sufficient. The goal is coordination and stability, not raw strength. If it's too easy, focus on slowing down the tempo or adding a stability ball between your limbs.