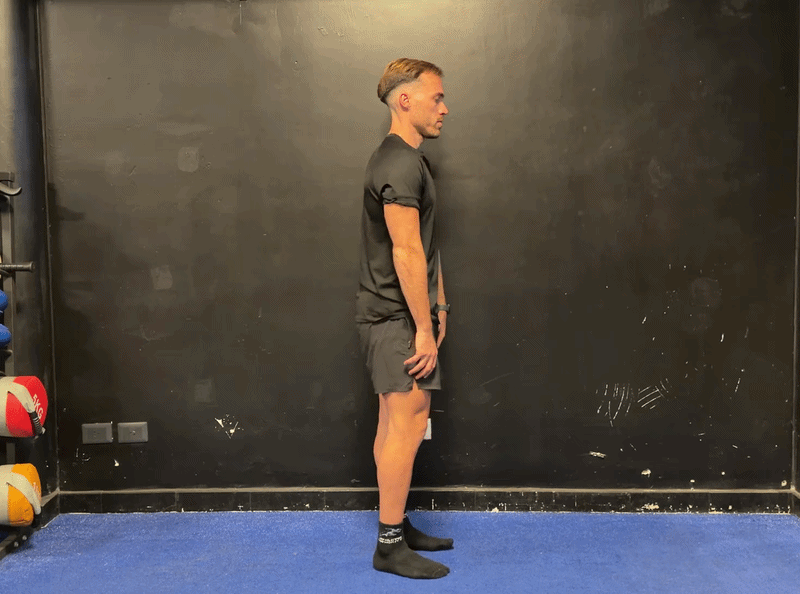
Tadasana : .Correct Postural Collapse
Learn what your true tall posture feels like.
A simple standing pose that trains full-body alignment—so you stop guessing and start feeling your real, stacked height.
How to · How To Do Tadasana (Mountain Pose)
Think of this as your “height blueprint” in standing.
- Base: Stand with your feet hip-width apart (or together if comfortable), weight evenly spread over heel, big toe and little toe so both feet feel equally heavy. This is the base of your whole height line.
- Feet / Arches: Gently grip the floor with your toes and lift your arches a touch so your feet feel active, not flat and dead. That small activation stops the knees and hips from collapsing inward.
- Knees / Hips: Soften (don’t lock) your knees and stack your hips over the middle of your feet. Think “thighs long and relaxed” instead of jammed back and rigid.
- Pelvis: Lightly squeeze your glutes and lower abs so your pelvis sits neutral—not dumped forward into swayback, not tucked hard under. This gives your lower back space to actually lengthen.
- Ribs / Core: Bring your ribs directly over your pelvis and let the front of your torso feel long, not flared. Imagine zipping up the front of your body so everything stacks in one column.
- Shoulders: Roll your shoulders up, back and down once, then let them rest. Keep the chest softly open with wide collarbones, not aggressively pulled back like a stiff military pose.
- Head / Neck: Gently tuck your chin and draw your head back so your ears line up over your shoulders. Grow through the crown of the head instead of lifting the chin or jutting the jaw.
- Breathe & Visualize: Breathe slowly through your nose and picture a string lifting you up from the crown. Each inhale grows you a little taller, each exhale relaxes unnecessary tension so “tall” starts to feel natural, not forced.
- “Feet grounded, hips over feet, ribs over hips, head over shoulders.”
- “Grow tall through the crown, not by lifting your chin.”
- “Relaxed tall, not robotic tall.”


Flow & Sets · Holds, Sets & Frequency (Height-Focused)
Small, frequent resets are key to training your new default posture.
Variations · Easy Variations
Same goal—clean alignment—just adjusted to your balance and mobility.


Height Impact · How Mountain Pose Boosts Your Height Line
- Tadasana lives in the Postural Collapse pillar: it trains you to stack ankles, hips, ribs, shoulders, and head in one clean vertical line instead of living in a rounded, collapsed stance.
- Poor standing posture (rounded shoulders, forward head, rib flare, swayback) can hide roughly up to ~2.5 cm of your real height in adults with strong collapse patterns.
- Short-term: a single honest Mountain Pose session can instantly make you look and often measure a bit taller—usually a modest bump (millimetres), and in very collapsed adults sometimes close to 0.5–1.0 cm when they first learn to stack properly.
- Long-term: when you practice Mountain Pose regularly and combine it with other posture drills in the Height app (Standing Posture Reset, Wall Angels, Chin Tucks, Cobra), you can realistically reclaim around 0.5–1.5 cm from the Postural Collapse slice over weeks and months, depending on how bad your slouch was to start.
- You’re not changing bone length—you’re teaching your nervous system a new “default blueprint” for standing tall so you actually use the height you have.

Panel 1 – Common Postural Collapse
Head pushed forward, chest slumped and pelvis dumped into
swayback. This everyday slouch compresses your spine and can
hide a noticeable chunk of your standing height.

Panel 2 – Tadasana Vertical Stack
Ankles, hips, ribs, shoulders and head line up in one clean
vertical column. This is where you reclaim those extra
millimetres–centimetres of visible height by actually using your
full spinal length.
Form & Safety · Key Technique Cues, Precautions & Common Mistakes
- Keep your weight balanced—not all in your heels, not dumped into your toes.
- Let your arms hang naturally with gentle tension, not stiff straight or overly posed.
- Think “soft ribs down” rather than aggressively sucking in your stomach.
- Keep your jaw and face relaxed; posture should feel alert but calm.
This is a low-risk, foundational pose. Focus on pain-free movement.
- If you get lightheaded standing still, shift your weight gently and keep breathing—don’t lock your knees.
- Neck issues? Make the chin tuck smaller; use Chin Tuck drills separately for deeper neck work.
- Stop if you feel sharp pain in the spine or joints—this should feel like alignment, not strain.
- Over-correcting into a stiff, military posture you can’t maintain.
- Jamming your knees locked and tilting the pelvis forward.
- Pushing the chest up and ribs out instead of stacking them over the hips.
- Lifting the chin to “look tall” instead of lengthening through the crown of the head.
Why it steals height: This “soldier stance” compresses your lower back and pushes your weight in front of your ankles, which shortens your vertical line instead of letting you stack tall from feet to crown.

Why it steals height: It looks like you’re “trying to be tall”, but you shorten the back of the neck and upper spine instead of lengthening through the crown of your head, so you actually lose clean height at the very top of the stack.

Pair With · Best Exercises to Pair With Mountain Pose (Postural Pillar)
For the Postural Collapse pillar, Mountain Pose works best with:
Tadasana sets your baseline alignment. Pair it with mobility drills (Wall Angels, Cat-Cow, Cobra) to open up the stiffness that prevents proper stacking, and daily micro-resets (Standing Posture Reset) to apply the form in real life.
FAQ · Tadasana – Height-Focused FAQs
Fast answers to the most common questions about the Mountain Pose blueprint.
-
Q1 Isn’t this just “standing up straight”? ›Kind of—but most adults have no idea what true neutral alignment feels like. Tadasana gives you a repeatable template for tall, efficient posture instead of random guessing.
-
Q2 How long before this changes my default posture? ›If you practice daily and pair it with strength/mobility drills, many people notice their “default stance” improving within 2–4 weeks.
-
Q3 Should I stand like this all day? ›Use this as your north star. You won’t hold perfect Tadasana 24/7, but frequent check-ins pull your average posture higher and closer to your real height.