Plank : .Prevent Spinal Collapse
Build a strong front line so your spine can stack tall instead of collapsing.
Plank teaches your core to support your spine in a straight, tall line—so when you stand, sit or walk, your body can actually hold the height you unlock with decompression work.
How to · How To Do Plank (Height-Optimized)
This isn’t a random “ab burn”—it’s a straight, tall line drill that your posture will copy later.
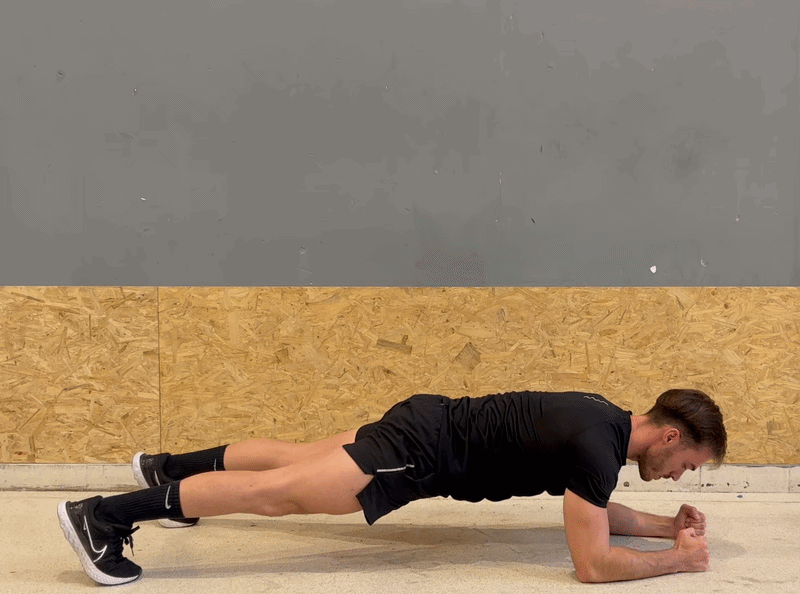
- Step 1 – Set up on your forearms: Kneel on the mat and place your forearms down with elbows directly under your shoulders, hands flat or lightly clasped. Knees stay on the floor for now while you lengthen your spine from head to tail in one straight line.
- Step 2 – Step back into a straight line: One leg at a time, step your feet back until your body forms a long line from heels to head. Feet are hip-width, heels driving back, and your gaze is slightly in front of your hands so your neck stays long, not cranked up or hanging down.
- Step 3 – Lock in the brace: Gently squeeze glutes, lightly tuck your tailbone (no big butt scoop) and draw your ribs toward your hips so your low back feels supported, not saggy. Think of zipping your front body up from pubic bone to ribs.
- Step 4 – Breathe and hold tall: Take slow, calm breaths into the sides of your ribs while maintaining that straight line. If you feel your hips sag or pike, reset rather than grinding through bad reps.
- Step 5 – Finish before form collapses: End the set the moment your line starts to fall apart. Quality holds teach your body to memorize tall posture; sloppy holds just teach bad patterns.
- “Heels back, crown forward—grow long, not just low.”
- “Slight tail tuck, ribs down, breathe around the brace.”
- “Stop the set when your line breaks.”


Flow & Sets · Holds, Sets & Frequency (Height-Focused)
Enough time under tension to build support, not so long that you collapse into bad posture.
Tip: In the Height app, your plank hold times scale with your actual performance—if your form breaks early, the app doesn’t reward you for ego reps.
Variations · Easy Variations
Same height goal—train the straight line—just scaled to your current strength and back tolerance.


Height Impact · How Plank Supports Your Height Line
- A weak or “sleepy” core makes it hard to maintain tall posture—your low back arches, ribs flare and your head drifts forward, all of which shave height off your standing line.
- A good plank builds an even front brace from shoulders to hips, which keeps your spine stable while you walk, sit and train decompression moves.
- Short-term, you’ll feel more “held together” when you stand up after plank, with less sagging in your low back and a clearer sense of where neutral is.
- Long-term, pairing plank with decompression work (Passive Hang, Knees to Chest Rock) and posture drills (Tadasana, Standing Posture Reset) helps you realistically reclaim around 0.3–0.8 cm from the Core & Posture slice by removing lazy sagging and exaggerated arching.
- You’re not lengthening bones—you’re teaching your frame to stay long and supported under gravity all day.

Panel 1 – Tall Line on the Floor From the side, his body forms a clean line from heels to crown. A soft blue glow traces through ankles, knees, hips, ribs, shoulders and neck, showing how plank rehearses the exact tall pillar we want when he stands.

Panel 2 – Standing Posture Carryover After plank, he stands with pelvis neutral, ribs over hips and head stacked over shoulders. That same blue line now runs through a relaxed, upright standing posture—your “plank line” upgraded into real-world height.
Form & Safety · Key Technique Cues, Precautions & Common Mistakes
- Elbows under shoulders, forearms parallel, hands relaxed.
- Heels push back, crown reaches forward—grow long, not saggy.
- Gentle tail tuck and ribs down so your low back feels supported.
- Neck stays long with your gaze slightly ahead of your hands.
A well-done plank is generally safe, but intensity and control matter.
- If your low back hurts, shorten the hold or drop to a kneeling or elevated version.
- Avoid holding your breath—use slow, calm breaths to keep tension healthy.
- Stop immediately if you feel sharp pain, burning in the spine or numbness.
- Letting hips sag so the low back collapses.
- Piking hips too high and turning it into a triangle pose.
- Jamming the head down or craning the neck up.
- Holding way past your clean form just to “survive” the set.
Why it steals height: All the load dumps into the lumbar spine instead of being shared along the whole front line. That pattern encourages the exact swayback posture that compresses your discs and robs you of height.

Why it steals height: The core isn’t learning to support a tall, straight line. Instead, the body practices a hunched, shortened position that carries into standing and walking.

Pair With · Best Exercises to Pair With Plank
For the Core & Posture pillar, Plank works best with:
Use Plank after mobility and decompression so your core learns to lock in that taller spine. Then layer in Standing Posture Reset or Tadasana so the “plank line” becomes your new normal when you’re on your feet.
FAQ · Common Questions About Plank
-
Q1 How long should I hold Plank for height benefits? ›Quality matters more than a huge timer. If you can only hold 15–20 seconds with a perfectly straight line, that’s more valuable than a 60-second hold with sagging hips and a screaming low back. Over time, aim to build toward 30–40 second clean holds.
-
Q2 Can Plank make me shorter by compressing my spine? ›Done properly, Plank shouldn’t compress your spine—it should teach your core to support it. You’re holding a long, neutral line, not jamming into an over-arched low back. If your back feels worse after, you likely need to shorten the hold, use a kneeling or elevated version, and tighten up your technique.
-
Q3 What if my shoulders or wrists hurt in Plank? ›Try forearm plank (like this version) to take load off the wrists, or use an elevated plank with hands on a bench or counter. If shoulders ache, check that elbows are under shoulders and you’re gently pressing the floor away instead of sinking into the joint.